Cyber Security News Aggregator
.Cyber Tzar
provide acyber security risk management
platform; including automated penetration tests and risk assesments culminating in a "cyber risk score" out of 1,000, just like a credit score.How-to: Make Your Own Cert With OpenSSL on Windows (Reloaded)
published on 2021-06-07 00:00:00 UTC by Didier StevensContent:
As several things have changed since I published “Howto: Make Your Own Cert With OpenSSL on Windows” 5 years ago, I’m publishing an updated how-to.
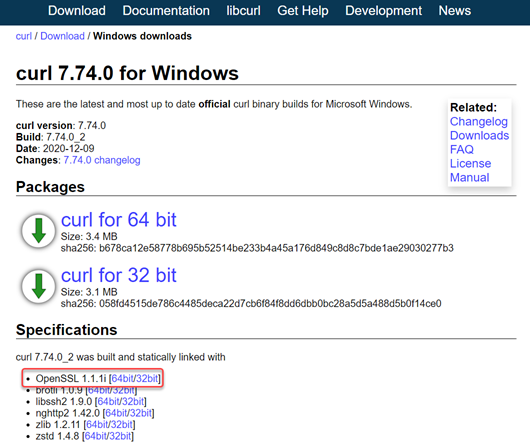
This time, I’m using the OpenSSL Windows binaries provided by the Curl developers:
I’m using OpenSSL version 1.1.1i. I chose the 32-bit version, so that you can still follow along in case you have to do this on a 32-bit computer.

This OpenSSL version from the Curl developers is packaged inside a ZIP file: it requires no installation with administrative rights. Just unzip the downloaded file.
Then open a command-line (I’m using cmd.exe) and go to the unzipped folder:

I issue the command “openssl version”, to check that I can run OpenSSL.
Now you are ready to follow along.
And just like in my previous how-to(s), I’m creating 2 certificates (not just one self-signed certificate): one root certificate and one subordinate certificate.
First we generate a 4096-bit long RSA key for our root CA and store it in file ca.key:
openssl genrsa -out ca.key 4096

This generates a private key that is not password protected. It is stored inside file ca.key as printable text (PEM format):

If you want to password-protect this private key, add command option -aes256 to encrypt the private key with AES using a key derived from a password you will be prompted for.
Next, we create our self-signed root CA certificate ca.crt; you’ll need to provide an identity for your root CA:
openssl req -new -x509 -days 1826 -key ca.key -out ca.crt -config openssl.cnf

The -x509 command option is used for a self-signed certificate. 1826 days gives us a cert valid for 5 years.
On Windows, you can double-click the root certificate we just created (ca.crt), and inspect it:


Next step: create our subordinate CA that will be used for the actual signing. First, generate the key:
openssl genrsa -out ia.key 4096

Then, request a certificate for this subordinate CA:
openssl req -new -key ia.key -out ia.csr -config openssl.cnf

Make sure that the Common Name you enter here is different from the Common Name you entered previously for the root CA. If they are the same, you will get an error later on when creating the pkcs12 file.
Next step: process the request for the subordinate CA certificate and get it signed by the root CA.
Here the command requires an extra option, that I did not use in previous how-tos. We need a small text file (altname.cnf), with the following content:
subjectAltName=DNS:www.didierstevens.com

I use the same value as I used for the Common Name (CN): http://www.didierstevens.com.
This subjectAltName is necessary, since Google Chrome version 58 and later no longer use the CN when there is no subjectAltName.
After creating this altname.cnf file, we can issue this command to create the subordinate CA signed by the root CA:
openssl x509 -req -days 730 -in ia.csr -CA ca.crt -CAkey ca.key -set_serial 01 -out ia.crt -extfile altname.cnf

The certificate (ia.crt) will be valid for 2 years (730 days) and I decided to choose my own serial number 01 for this cert (-set_serial 01). For the root CA, I let OpenSSL generate a random serial number.
You can also inspect this certificate (ia.crt) with Windows:

That’s all there is to it! Of course, there are many options I didn’t use. Consult the OpenSSL documentation for more info. For example, I didn’t restrict my subordinate CA key usage to digital signatures. It can be used for anything, even making another subordinate CA. When you buy a code signing certificate, the CA company will limit its use to code signing. And I did not use passwords to protect my keys. In a production environment, you want to protect your keys with passwords.
To use this subordinate CA key for Authenticode signatures with Microsoft’s signtool, you’ll have to package the keys and certs in a PKCS12 file:
openssl pkcs12 -export -out ia.p12 -inkey ia.key -in ia.crt -chain -CAfile ca.crt

Then it can be used to sign a Windows PE file:
signtool sign /f ia.p12 /fd sha256 /td sha256 /tr http://timestamp.globalsign.com/?signature=sha2 Dialog42.exe


Some Observations
Configuration file
Some OpenSSL commands (like the req command we used) require the openssl.cnf configuration file. That is why on Windows, we use command option: -config openssl.cnf
If we do not use this command option on Windows, we get an error:
Can't open C:/Windows/System32/OpenSSL/ssl/openssl.cnf for reading, No such file or directory
22256:error:02001003:system library:fopen:No such process::0:fopen('C:/Windows/System32/OpenSSL/ssl/openssl.cnf','r')
22256:error:2006D080:BIO routines:BIO_new_file:no such file::0:

Even if we run openssl.exe in the same folder as openssl.cnf.
Another option is to set environment variable OPENSSL_CONF to point to the configuration file:
set OPENSSL_CONF= c:\Demo\openssl-1.1.1i_2-win32-mingw\openssl.cnf
Then we can issue commands without referencing the openssl.cnf explicitly:

Command option subj
When we use command req like we did, we are prompted for extra information. This extra information can be passed via the command line too, with command option -subj:
openssl req -new -x509 -days 1826 -key ca.key -out ca.crt -subj “/C=BE/ST=/L=Brussels/O=Didier Stevens/OU=/CN=didierstevens.com/emailAddress=ca@didierstevens.com” -config openssl.cnf

Do not use interactive mode
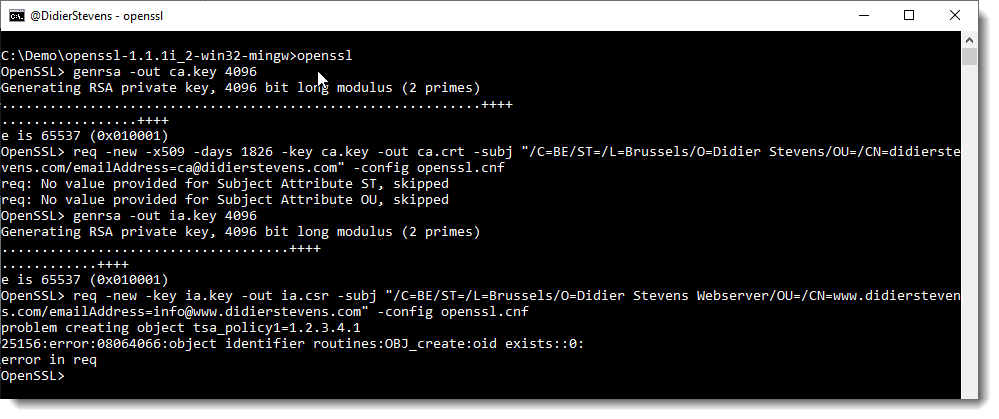
Interactive mode in OpenSSL, is when you launch opensll.exe, and then issue commands at the OpenSSL prompt, like this:

The error message:
problem creating object tsa_policy1=1.2.3.4.1
25156:error:08064066:object identifier routines:OBJ_create:oid exists::0:
error in req
is a known issue with OpenSSL.
Interactive mode doesn’t “clean up” correctly between commands: it is best not to use interactive mode.
Certificates with a validity period longer than one year
I know that Chrome is no longer accepting certificates with a validity period longer than one year, so I expected my 2-year certificate to be rejected by Chrome (using Chrome 87 on Windows). It was not.
It turns out that this requirement does not apply to certificates like the one I created:
Beginning with Chrome 85, TLS server certificates issued on or after 2020-09-01 00:00:00 UTC will be required to have a validity period of 398 days or less. This will only apply to TLS server certificates from CAs that are trusted in a default installation of Google Chrome, commonly known as “publicly trusted CAs”, and will not apply to locally-operated CAs that have been manually configured.
X.509 Version 1 and Version 3
In my previous blog posts on OpenSSL, the created root certificates (ca.crt) are X.509 Version 3 certificates, and the created subordinate certificates (ia.crt) are X.509 Version 1 certificates. That’s because I did not use any version 3 extensions for the subordinate certificates, and thus OpenSSL creates version 1 certificates.
This changes with the use of the Subject Alternative Name (SAN) extension (subjectAltName) in this how-to. subjectAltName is a version 3 extension, and thus the subordinate certificate (ia.crt) created in this how-to is a version 3 X.509 certificate. In this how-to, I had only one Common Name and therefore I used just one SAN: DNS:www.didierstevens.com.
It is possible to use several SANs, and not only DNS, but also IP for example:
subjectAltName=DNS:www.didierstevens.com,DNS:*.didierstevens.be,IP:127.0.0.1
There are also version 3 extensions that dictate what a certificate can be used for. When these extensions are not present, a certificate can be used for everything.
If you want to limit the use of a certificate to web servers, you can use the following values:
basicConstraints = CA:FALSE
keyUsage = nonRepudiation, digitalSignature, keyEncipherment
extendedKeyUsage=serverAuth
subjectAltName=DNS:www.didierstevens.com
This one can not be used for code signing:
SignTool Error: No certificates were found that met all the given criteria.

And you can use the following values to limit the use of a certificate to code signing:
basicConstraints = CA:FALSE
keyUsage = digitalSignature
extendedKeyUsage=codeSigning
Caveat: I just did some basic tests with these extensions. For example, the cert restricted to code signing can be used by signtool, and Chrome will refuse it when I use it with my simple web server. I didn’t do exhaustive testing to see if code signing is the only thing this cert can be used for.
I did compare it with a commercial code signing certificate I acquired years ago, and there was a difference for the keyUsage: it was marked as critical.
basicConstraints = CA:FALSE
keyUsage = critical,digitalSignature
extendedKeyUsage=codeSigning
Installing the root certificate
When you use the subordinate certificate, you will see that it is still rejected by web browsers, and that the Authenticode signature is not valid.
That is because the subordinate’s root certificate is not trusted. If you install it as a trusted root certification authority, the subordinate certificate will be trusted.
Linux
You can use the same commands on a Linux machine where the OpenSSL package is installed.
Don’t use command option -config though: openssl will find its config file.
And I got an issue with the command option -subj and “empty strings”:
problems making Certificate Request
140254820331968:error:0D07A098:asn1 encoding routines:ASN1_mbstring_ncopy:string too short:../crypto/asn1/a_mbstr.c:100:minsize=1

I had to remove ST= and OU=.
https://blog.didierstevens.com/2021/06/07/how-to-make-your-own-cert-with-openssl-on-windows-reloaded/
Published: 2021 06 07 00:00:00
Received: 2021 06 07 00:06:05
Feed: Didier Stevens
Source: Didier Stevens
Category: Cyber Security
Topic: Cyber Security
Views: 21
